やる事
今回は、日本語と英語を切り替えるボタン実装し、ボタンを押したら画面に表示されている言語を日本語と英語に切り替える多言語対応の実装をしていきます。
※ Next.js + Typescriptプロジェクトの環境は構築済みのものとして進めます。
i18next とは
初めに、i18next がどういうものかを簡単に紹介したいと思います。
i18next は、ドキュメントにもあるように、JavaScript で記述された国際化フレームワークで、翻訳・多言語対応を提供してくれます。また、React 以外にも、Node.js、PHP でも使用できるそうです。
また、i18nとは「国際化対応 (Internationalization) 」の略らしいです。
実行環境
今回は以下の環境で実装していきます。
- React : 18.3.1
- NextJs : 14.2.15
- Typescript : 5.6.3
- i18next : 23.16.4
- MUI : 6.1.6
実装
i18next と MUI をインストール
ではまず、i18next と MUI をインストールしていきます。CLIで以下のコマンドを叩きます。
- i18next
npm install react-i18next i18next --save - MUI
npm install @mui/material @emotion/react @emotion/styled多言語ファイルの作成
インストールが終わったら、プロジェクト直下に /locales ディレクトリを作って、その中に、今回使用する日本語と英語の言語データを格納します。
- 日本語の言語データを作成を
/locales/ja.jsonに以下の内容で作成します。
{
  "ja": "日本語",
  "en": "英語",
  "user": { "name": "名前" },
  "selfIntroduction": "私の名前は{{name}}です。",
  "error": {
    "unspecific": "問題が発生しました。",
    "404": "ページが見つかりませんでした。"
  }
}- 英語の言語データを以下の内容で作成します。
{
  "ja": "JA",
  "en": "EN",
  "user": { "name": "Name" },
  "selfIntroduction": "my name is {{name}}",
  "error": {
    "unspecific": "Something went wrong.",
    "404": "The page was not found."
  }
}ご覧の通り、「ja.json」と「en.json」はキーが同じです。これは例えば、日本語表示の時に「ja」を使っているところは「日本語」、英語表示の時は「JA」と表示されるようになります。
i18next の設定
次は、i18nextの設定を行なっていきます。
まずは、Typescript用に型宣言ファイルから作成します。プロジェクト直下に「/@types/i18next.d.ts」を以下の内容で作成します。
// /@types/i18next.d.ts
// import the original type declarations
import "i18next";
// import all namespaces (for the default language, only)
import jaJson from "../locales/ja.json";
import enJson from "../locales/en.json";

declare module "i18next" {
  // Extend CustomTypeOptions
  interface CustomTypeOptions {
    // custom namespace type, if you changed it
    defaultNS: "ja";
    // custom resources type
    resources: {
      ja: typeof jaJson;
      en: typeof enJson;
    };
  }
}
i18nextの設定ファイルを「/src/libs/i18n/i18n.ts」に以下の内容で作成します。
各プロパティの説明は簡単にコメントアウトで記載します。詳しくは、こちらを参照ください。
// /src/libs/i18n/i18n.ts
import i18n from "i18next";
import { initReactI18next } from "react-i18next";
import jaJson from ".././../../locales/ja.json";
import enJson from ".././../../locales/en.json";

const resources = {
  ja: { translation: jaJson },
  en: { translation: enJson },
};

i18n.use(initReactI18next).init({
  lng: "ja", // 使用する言語
  fallbackLng: "ja", // 言語での翻訳が利用できない場合に使用する言語。
  resources, // 使用する言語ファイル
  interpolation: {
    // react already safes from xss
    escapeValue: false, // XSSインジェクションを回避するために渡された値をエスケープする
  },
});

export default i18n;
export type ErrorType = keyof typeof jaJson.error | keyof typeof enJson.error;「/src/libs/i18n/i18n.ts」で作成したファイルを「/src/app/layout.tsx」でimportします。
// /src/app/layout.tsx
"use client";
import "../libs/i18n/i18n"; // これをimportする

export default function RootLayout({
  children,
}: Readonly<{
  children: React.ReactNode;
}>) {
  return (
    <html lang="ja">
      <body>{children}</body>
    </html>
  );
}
設定は以上になります。
多言語切り替え用のページを実装
次に、言語切り替え用のページを作成します。「/src/app/language/page.tsx」を以下の内容で作成します。
// /src/app/language/page.tsx
"use client";
import { ErrorType } from "@/libs/i18n/i18n";
import { ToggleButton, ToggleButtonGroup } from "@mui/material";
import { useTranslation } from "react-i18next";

export default function Page() {
  const { t, i18n } = useTranslation();
  const errorCode404 = "404";
  const errorCode502 = "502" as ErrorType;

  const onChangeLanguage = () => {
    const nowLng = i18n.language; // 現在の言語を取得
    i18n.changeLanguage(nowLng === "ja" ? "en" : "ja");
  };
  return (
    <>
      {/* 言語切り替えのボタン */}
      <ToggleButtonGroup
        value={i18n.language}
        onChange={onChangeLanguage}
        exclusive
        sx={{
          ".Mui-selected": {
            bgcolor: "#87cefa !important",
            ":hover": { bgcolor: "#87cefa" },
          },
        }}
      >
        <ToggleButton value="ja" sx={{ width: "70px" }}>
          {t("ja")}
        </ToggleButton>
        <ToggleButton value="en" sx={{ width: "70px" }}>
          {t("en")}
        </ToggleButton>
      </ToggleButtonGroup>

      <div>{t("user.name")}</div>
      <div>{t("selfIntroduction", { name: "田中 太郎" })}</div>
      <div>{t("selfIntroduction", { name: "鈴木 一郎" })}</div>
      {/* error.404 */}
      <div>{t([`error.${errorCode404}`, "error.unspecific"])}</div>
      {/* error.502 */}
      <div>{t([`error.${errorCode502}`, "error.unspecific"])}</div>
    </>
  );
}
解説
少し実装内容を解説したいと思います。
i18next では useTranslation の hook が提供されているのでこれを使います。
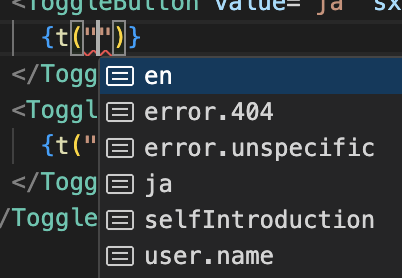
「t」はコンテンツを翻訳する機能を提供し、「i18n」はインスタンスを取得します。また、「t」には、json ファイルで作ったキーを文字列で渡します。型宣言ファイルを作成しているので、「{t("")}」中で補完機能(候補トリガー)が使え、登録していないキーを入力した時にエラーを吐いてくれます。(以下画像参照)


<div>{t("selfIntroduction", { name: "田中 太郎" })}</div>上記は、多言語ファイルの作成で作ったjson ファイル内にある「"selfIntroduction": "私の名前は{{name}}です。"」の {{name}} の部分を第二引数で渡すことができます。上記の場合、「私の名前は田中 太郎です。」と表示されます。
{/* error.404 */}
<div>{t([`error.${errorCode404}`, "error.unspecific"])}</div>
{/* error.502 */}
<div>{t([`error.${errorCode502}`, "error.unspecific"])}</div>
上記、 "error.404" は、jsonファイル内の error オブジェクトに存在するので、日本語の時は「ページが見つかりませんでした。」、英語の時は「The page was not found.」が表示されるはずです。
また、 "error.502" は error オブジェクトに存在しないので、1番目の要素の "error.unspecific" が扱われ、日本語の時は「問題が発生しました。」、英語の時は「Something went wrong.」が表示されると思います。
画面表示
では、「npm run dev」で起動後して「localhost:3000/language」にアクセスします。すると以下の画面が表示されるかと思います。
画面上部にある、「日本語・英語」・「JA・EN」ボタンをクリックすると、日本語と英語に切り替わるようになっていると思います。(※ 今回、自己紹介の引数で渡している名前は、日本語でのみなので、英語表記でも「田中 太郎」、「鈴木 一郎」となっていますが、、、)
以上、i18nextを使った多言語対応でした。
i18nextは他にも、便利機能や他のプログラミング言語でも使えるみたいなので、また触ってみようと思います。
